Thursday, June 26, 2008

THE KAYAK FLOATS!!

This evening, in an informal outing with just Leighann and 5,000 blood thirsty mosquitos, I launched my kayak into the water. All the hard work, epoxy dust, varnish fumes and sanding over the past 6 months finally paid off. Not that it wasn't all about the journey, the process of building, but I always knew that the first paddle would be sweet and I would have my own, hand-built wooden sea kayak to show for all the hard work. 

The boat glided through the river with ease, and water shed off the varnished deck. As we paddled along the shoreline, a very gentle warm summer breeze pushed us along in our discovery. A little later, longer shadows and threatening blisters told us it was time to turn around. 

I'd like to thank everyone for reading and viewing the blog over the past 6 months. You have been so supportive and your comments (and contributions to the kayak fund) helped me more than you know. The construction might be done, but stick around for summer kayak tales of adventure.

Mark


Loading up the boats.


Ready for launch.


The first voyage.

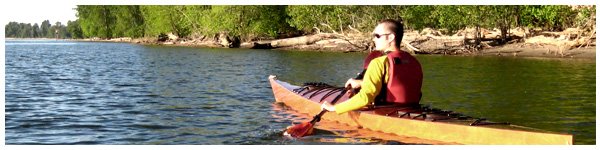
Exploring the shoreline.

Reflections.

Happy Captain.

Perfect.


Sunday, June 22, 2008

4th Coat and Outfitting

I could not be more close to being finished at this point in the game. Seriously. Tomorrow, the boat will be done. What else do I have to do? Three things:

1. glue seat in place
2. attach back brace straps to sheer clamp
3. tie rope loops through the bow and stern holes

Yes, that's it!

This afternoon I finished up the bungie cord and hatch cover rigging. I also installed the pieces of wood that hip padding foam is glued to. I need to let the epoxy set that I used to mount the hip pad braces over night. 

Here are a few photos:


These straps are screwed into the deck with brass fittings.


The straps are then run through the buckles to keep the hatch down.

Here's a look at the rigging set up.


Monday, June 16, 2008

3rd Coat

I don't have any photos of the 3rd coat, it's all starting to look the same to me at this point. I think it's even possible that some areas that had small dust particle bumps on the first coat are getting more noticable as I add more layers of varnish. So I'm being a little more diligent on the sanding in between the 3rd and final coat of varnish.

Since I was not super motivated to sand (yet again) this weekend after varnishing, I did a few things that will speed up the finishing. Here are some photos:

Drilling pilot holes for the installation of the back rest.


I drilled the 3/8" holes for the rope handles through the bow 
and stern. Kind of scary drilling through the boat! In this photo, 
the blue tape is protecting the varnish from the epoxy that I
coated the the hole with to protect the bare wood from water.


Here's the back support. Elastic bungie cords come off the back
of the pad and stretch to form it's shape.


This is the seat which, in this photo, is upside down. I glued the 
two pieces of foam together with automotive contact cement.

Friday, June 13, 2008

2nd Coat Photo

Okay, here's a photo from this morning. Two coats of varnish. 


Thursday, June 12, 2008

2nd Coat of Varnish

I don't have any photos of the 2nd coat of varnish that I applied today, but it's still looking great. A couple more to go!

Here's a different photo from the first coat, as it's looks pretty much the same.


Sunday, June 8, 2008

1st Coat Varnish


It's stunning the difference the varnish makes, especially this first coat which took the dull epoxy to a radiant wood grain glow. I think the above photos speaks for itself. I'm very excited how this is turning out!

Saturday, June 7, 2008

The Inner Glow

I finally finished the epoxy sanding yesterday! what a chore. Everything is smooth now and almost ready for varnish. I noticed a few areas of bare wood on the nose and stern where I needed to brush on a layer of epoxy to seal and protect, which I did, and now I'm waiting for that to cure. 

In preparation for varnishing, though, I had to sterilize the shop so no errant dust will settle into wet varnish. And after 4 days of sanding, cleaning up was no small task. Sweeping. Vacuuming. Mopping. It's pretty clean now, but I know it's not surgical clean, so I expect some dust. 

Because the epoxy I brushed on today needs time to cure, and being anxious to see the varnish go on, I realized I could put the first coat of varnish on the hatch covers! I don't think I mentioned it before, but the Hatch Cover Color Survey resulted in a resounding opinion on the stained hatches and they look great. Anyway, I cracked open the can of varnish and poured a little into a cup. It's funny, but the smell reminded me of Maine, when I would visit my grandparents. I'm know my grandfather had a can or two of varnish kicking around, and 3 or 4 concurrent projects in various stages of varnishing. And it smelled like the wooden boat building apprentice shop across the harbor he would take me to.

I dipped the foam brush, curious how the sanded, cloudy epoxy would look within a few seconds. Brush, brush, brush. Wow! Varnish is transformative. Gone is the dull, lifeless wood surface. It's almost like the wood and grain are glowing. It's amazing. I can't wait to brush on the boat.

This photo of the front hatch shows the difference between the 
dull, sanded epoxy on the left and the brush stroke of varnish 
on the right.


Here's the varnish mid progress. The large hatch has a coat and 
you can see the reflection of the light and plastic tent over head. 

Friday, June 6, 2008

Wheel Design

The couple of times that Leighann and I have carried her new kayak to the water, it's become clear very quickly that kayaks are damn heavy. And the farther you have to walk the more it feels like your shoulder is going to become dislocated. So I started looking into carts that are sold to just for moving kayaks, which I found out quickly, are all usually over $130. Perhaps I can build my own kayak cart, something that the boat can be strapped to and also disassembled and stowed in the boat when paddling. 

After some research and design, here are my 3D renderings of my kayak cart design. Of course, I'm putting the *ahem* cart-before-the-horse at this point, my kayak is not even finished yet.


Here's the schematic using easily found materials.


Here's how the boat and cart interface. I would also strap
the boat to the cart to secure it while wheeling. 

Tuesday, June 3, 2008

Sanding Update

Yes, there IS a lot of sanding to do. I'm making progress, but it's going slowly. I'm still on the first pass with the 80 grit paper. Weekend and evening plans have slowed the progress considerably. Here are a couple photos:


Here's the exterior hull sanded with 8o grit. There's a lot of epoxy dust
on the surface, but the goal is sanding is to essentially scuff the 
surface of the epoxy until it's cloud white.


Here's a good example of the difference between sanded and 
un-sanded epoxy.

Thursday, May 29, 2008

Major Milestone!


Don't get too excited just yet, there's a lot of sanding and varnishing left to do, but this is still a huge milestone in the kayak construction!! No more epoxy. No more scarf joints. And I have to say the boat is looking sharp. Sure, there are hardened epoxy drips and uneven surfaces, but that's what I'm working on next: sanding the exterior of the entire boat. I'll go through three courses of sandpaper grit (80, 120 and 220) to work the epoxy smooth and flat. Once that's complete, I varnish the boat, let it dry, wet sand, let it dry, varnish, let it dry, wet sand, let it dry, varnish, .....  on and on. I hear five coats of varnish looks amazing. 

Until then, here's a toast to getting this far.

Tuesday, May 27, 2008

Rafting Trip

I didn't progress much the past few days, we were out of town for the Memorial Day weekend on a rafting trip in northeastern Oregon. I can't complain too much that I didn't work on the kayak as I was meandering down the John Day River with Leighann and eight other fun people. Here's a teaser photo and a link to my photos from the trip:


Still needing to make progress for my end of June deadline, I did spend an hour in the shop this evening working on the hatch openings and coaming. As you can see from the photo below, the hatch opening rim is not stained; I thought this would be a nice accent that's revealed only when the hatch covers are removed. To prep for the epoxy sealing I did today I used my new cylindrical grinder attachment to smooth the hatch openings. 

Here's the hatch rim which will be this color for the completed boat.


Here's the coaming after a second coat of epoxy. I will probably put on a
third and final coat for extra protection.

Thursday, May 22, 2008

Sanded and Stained

I tried to tackle the coaming sanding with a sanding block and sheer strength, that lasted about 20 minutes and resulted in sore muscles and little progress. Then I bought this:


A sanding drum and sand paper sleeves that slide onto the drum. The drum is then chucked to my cordless drill. WOW. It was the best $9.00 investment I ever made. I plowed through the tough layers of epoxy and wood with little effort, saving me hours and hours of frustrating hand work. 

The result was a smooth coaming but one that needed to be stained again. No big deal. Here's the final sanded and stained coaming:


I have also been working on the hatches concurrently with the coaming construction. In the last post, you'll remember, I strengthened the hatches by gluing supports to the underside of the deck. The next step for the hatches was to epoxy to the hatch rims to the deck exterior. The serves as a lip to help seat the hatch cover and maintain a water tight seal. Here's the forward hatch rim getting ready to be clamped down in place.


Tuesday, May 20, 2008

"Coaming" Along

Here's an illustrated walk through what I have been up to in the kayak shop:


Here's how the coaming looks after taking off all the clamps and sawing off
the excess inside deck area. Looks great but there's a TON of sanding where
all the sandwiched layers are now exposed.


This is the forward hatch cutting guide. First I find the center line (pink string)
and then position this guide and trace around it onto the deck. I follow this 
guideline with the jigsaw.


You can see where I drilled a starter hole for the jigsaw blade to start from. 
Drilling and sawing through the deck was just a little nerve-racking.  


In this photo of the aft hatch you are looking at the reinforcement plywood
that I glued to the underside of the deck to strengthen the opening.

Here, once again, lots of clamps. This time they are securing the hatch
reinforcement layers as the epoxy cures.

Finally, as you can see from this photo, the current state of the kayak seems to 
be in pretty much disarray. Sawdust is covering every surface. Used rubber gloves 
scatter the floor. Discarded sandpaper is thrown about. Rest assured, this will all 
be gone soon enough.


Friday, May 16, 2008

I've got a fever...

...and the only prescription is: more clamps!

Today I glued the coaming and coaming spacers to the kayak cockpit. Sounds easy, of course. And it was, for the most part, straight forward. Here's the play by play. First I stained the coaming to match the deck, but that was simple and took about 2 minutes for the stain to dry because it's 95° in my back yard today. 

After marking the centerline of the boat, I knew where the coaming spacers had to go. These are the unstained pieces of wood in the photo and are used to raised the coaming above the deck so a spray skirt can be stretch over it. I coated each of these spacers with thickened epoxy and then nailed down the tips of the spacers along the centerline fore and aft. On top of the first spacer I glued and nailed a second. On top of the second spacer I glued the coaming. 

This is when the clamps come out. To bend the coaming to the contours of the deck, it's imperative to use as many clamps as possible, and c-clamps are better than spring clamps because of the added pressure they can apply. A good supply of both were in my shop.... I thought.

As I worked my way around the coaming, clamping every few inches, I began to realize that the c-clamps I have were too small in a few critical places. Basically, the depth that the clamp could slide laterally was too short because the excess deck in several places obstructed the clamp from reaching all the way to the coaming. OH CRAP. So, here I have wet epoxy that curing fast on a hot afternoon and I need bigger clamps. I have never driven to the hardware store so fast. 

I sped home with deeper clamps and tightened them into place, epoxy satisfyingly oozed out of the joints, as it should. Saved the day!


Here is the coaming and the spacers getting ready to be brushed with 
thickened epoxy.


This is the final clamping job. You can see spring clamps and c-clamps. 
Notice on the near side where the grey c-clamps are how much deck area the
clamp had to span to make a grip. The smaller blue clamps worked great in other
areas, but not here. After the epoxy is dry the next step is to cut away the excess 
deck on the inside area of the coaming.

Thursday, May 15, 2008

Extreme Kayaker Chick


Look what pulled into our driveway yesterday afternoon! Yes, that's Leighann looking pretty happy with herself next to her new kayak. I can't tell if she's more excited about the new boat or the fact that driving around with it on the car makes her look like an extreme sport chick (which she is, by the way).

Now with this new boat in the garage next to my boat, it's only sparked me even more to get my kayak finished. I can't wait! It does not help that the weather in Portland today will be 96°. I wish I could be out on the water.


Friday, May 9, 2008

Pop Quiz

It's time for a quiz. I'm debating the color scheme for the deck hatches and coaming ring, it's time for reader participation. Look at the two photos below that I have doctored in Photoshop. Which do you prefer? Please vote!


Stained hatches and coaming.


Varnished hatches and coaming.

Thursday, May 8, 2008

True Colors

This morning I laid down the fiberglass and first layer of epoxy on the deck, and let me tell you, the stained wood looks amazing! I was hoping the color and richness of the wood would start to show through after the first coat, and it sure did. The fiberglass for the deck is applied in two pieces, the overlap between the two pieces is around the cockpit area, and should be invisible as I put more and more epoxy layers. 


Here's the deck fiberglass in place, waiting for the epoxy.


And here's the stern section after the epoxy has been applied. The wood is really showing through nicely, though you can still see the texture of the fiberglass. As I add more layers of epoxy the texture will disappear. 

On a down note, I had to order more epoxy today, an unexpected expense. The kit comes with the necessary amount needed to build, but apparently that's for people who know how much epoxy to mix up an never waste any along the way. Sigh. Oh well, at least I know this boat is going to be water tight, with all the epoxy I put on this thing. 

Tuesday, May 6, 2008

PIMP My Boat

In an effort brought on by my creative desire to customize my boat, I applied a stain to the mahogany deck. This was not undertaken lightly. I had always wanted to do something different to the boat, it's the designer in me. My dream for a while was to figure out a way to apply or paint fluid lines across the hull and deck. That seemed daunting on my first time out. Then I stumbled upon this photo:


I love the simplicity of the color, a warm side panel and a darker deck. Wonderful! So, I set out to replicate that. I researched varnishes. Studies stains. Toiled over brushes. My greatest breakthrough came just a couple of days ago when I posted the above image on the CLC Boats (where I bought the kayak) builders forum website looking for advice. I found out that I needed to stain the wood prior to laying down fiberglass and epoxy onto the deck, which ironically, was exactly the point I was at in the build. 

I also learned from the forum what kind of stain I needed use (NOT oil based), how to apply it (with a brush or rag) and how to even out the overlapping brush marks (super fine steel wool). All of this cerebral knowledge did not  make the process any less nerve racking, though. 

To prepare, I masked the edge of the boat so no runs would escape me. I visualized what I needed to do. I re-read the forum tips. I sacrificed a small lamb to appease the Staining Gods. Screwing up the deck was the last thing I wanted to do. But, everything went pretty much as I expected. The deck is now covered with stain, in some places heavier than others. But that's okay, because I can use the steel wool to even things out. And, apparently, when the fiberglass and epoxy go down, it will even out even more. 

Here's the before:

And the after photo:


I'm sure the down the road the color will even out and even change as I add epoxy, fiberglass and, as the final steps, layers of varnish. But at this point I'm pretty happy to have a custom kayak.

Sunday, May 4, 2008

First Paddle, But Not Mine


"At last the anchor was up, the sails were set,
and off we glided. It was a sharp, cold Christmas; 
and as the short northern day merged into night, 
we found ourselves almost broad upon the wintry ocean, 
whose freezing spray cased us in ice, as in polished armor."
– Moby Dick

Perhaps a bit dramatic, but it's very exciting to announce that Leighann is buying a sea kayak!! Today's amazing weather inspired us to go down to the kayak shop on the Willamette and test paddle the Wilderness Systems Tempest 170. She loved it. Well that, and coupled with hours of research, talking to kayak experts, one lost craigslist posting and hundreds of online reviews, this is the one!


A "dry" run in the new kayak.

We Don't Need No Stinkin' Hatches

I've come down with a little bit of a cold and the thought of slipping the respirator over my face makes my sinus cavity throb. So, I have been taking it easy, working on a few steps that don't require lots of filtered air. This weekend I started preparing the deck hatches. These will ultimately cover the hatch openings that allow storage access in the fore and aft areas. 

The hatch covers are pretty simple to put together. here's the illustrated version:


This is the bottom of the aft hatch cover with 3" fiberglass cloth 
waiting for epoxy. The fiberglass adds extra strength but mostly 
helps to hold the curve the hatches will have.


Here you can see where the hatch ribs go. The contact side of the 
rib is slightly curved (to match the deck) and will bend the hatch 
cover when everything is clamped to dry.

This is the forward hatch cover and here you can see more clearly 
the curvature the ribs impart on the plywood. The clamps hold the 
bend and the ribs in place as the epoxy cures. I should be able to 
remove the clamps tomorrow and the curve will remain.