Friday, March 28, 2008

It's SNOWING?????

It's almost April. Winter should be a distant memory. Yet, this morning we woke up to big, heavy snow flakes falling. And an hour and a half later, it's still coming down. Ironically, we are going snow camping this weekend with friends up in the Mt Hood area, looks like at this rate we can save ourselves the drive and camp in the back yard.

In kayak news, I just got my new paddle!! It has sexy red blades and is super light. It's made by Werner Paddles, they are a local NW family owned company up near Seattle, where there is some of the best sea kayaking around. I can't wait to use it.

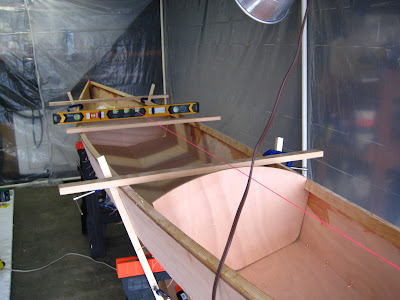
The interior of the boat is finished. The last coat of epoxy I applied last night is drying. The next step is to flip the boat back over and begin clipping off all the exposed copper wires and prepping the hull for fiberglass and epoxy.


Wednesday, March 26, 2008

WARNING!


I can't say why, 8  years ago, I bought these diamond shaped chemical warning stickers you see on the side of 18 wheelers. But they seemed pretty cool and like a fun thing to have on hand, for whatever reason that might be. Well, I was digging around in my storage box of decals and graphic design samples yesterday and these finally resurfaced and have been put to use. Purely as a joke of course, I don't have any flammable compounds or organic peroxide, whatever that is.

The reason why I started looking through the box in the basement in the first place was to find my supply of those old school rub-on-letters. I was inspired to begin the customization of my kayak by putting a little message on the surface of the rear bulkhead, an area that will be under the deck and behind the seat. "GetLost 08" will forever live incased under layers of epoxy as I paddle around. 

Also, in honor and inspiration of my grandfather, wooden boat builder extraordinaire, I applied the letters "afb" to the face of the forward bulkhead, down by where my feet will be. I'm sure this part of the boat will be hardly ever seen, but it was just for me, knowing that he will be floating around with me.


Sunday, March 23, 2008

Epoxy this!

I've reached the first gluing steps of the construction. The first step was to mix epoxy thickened with wood flour (super fine sawdust) and use this paste to spread out a "fillet" (pronounced fill-it) along the interior panel junctions. I used a small plastic squeegee to nicely spread the epoxy over the joints, but this didn't keep the glue from getting everywhere. It was a pretty messy job, I just tried to concentrate on achieving an even distribution and not gluing my phone to my gloves. 

After the fillets were spread out in the bow section, I unrolled precut strips of 3" fiberglass fabric along the wet epoxy. This acts to further reinforce the junctions by adding structural strength. The fiberglass lays nicely in the straighter stretches but as the panels converged in the bow it was a challenge to get the fabric to lay flat with out puckering. 

Once the fiberglass was gently pressed in place, I brushed unthickened epoxy over each strip until the fabric began to lose it's white color. I also brushed epoxy over the bare wood in the same area, this acts to begin to protect the wood from water, etc. I repeated these same steps in the aft section of the boat. All this took a somewhat grueling 3 hours hunched over the boat. 

Next step is to do the same thing for the middle cockpit section of the boat, with the added step of adding a fiberglass blanket over the entire cockpit area for extra strength and protection. I will also be adding a second coat of epoxy to the bow and  sections to add another layer for strength. 


Wednesday, March 19, 2008

Hmmm, that's odd...

I averted a miscalculated disaster yesterday by discovering the maximum beam (width) of the kayak had unknowingly grown from 23 1/2" to 24 1/2", an whole inch of near chaos. It came to my attention as I was attempting to fit the two plywood bulkheads in the fore and aft sections of the boat, there was just too much width room to understand. scratching my head, I whipped out the tape measure and to my surprise the boat's width was an inch too much. 

Let me see if I can explain what happened. The boat plans clearly state the proper beam of 23 1/2" and this is achieved (as instructed) by using a scrap spreader stick, cut to the necessary length. This stick is then wedged between the two side panels (see early blog post with the movie) to hold the side panels apart. I cut the spreader stick to exactly 23 1/8", which is shorter than 23 1/2" as to account for the two 3/16" plywood panels on each side (23.125" + .1875" + .1875" = 23.5"). Perfect. And when I first spread the side panels apart, it was perfect. 

What happened, I've deduced, is that the side panel beam became wider as I stitched the panels together. This occurred because the side panels at the shear clamp started to cantilever out as the lower portion of the panel was drawn in towards the centerline to meet the bottom panel. This movement was enough to add 1/2" width on either side. wow.

So I removed the spreader stick to shorten it to correct for the errors, cut it to size, pushed it back into place... 23 1/2". Now it's perfect!


Monday, March 17, 2008

I'm in stitches

Check it out! 

Some major hours in the shop this past weekend and I have a fully formed kayak hull to show for it. I meticulously worked my way down from the bow to the stern drilling 1/16" holes and threading 18 gauge copper wire through the holes and twisted them tight to draw the planks together. It's amazing how the wood bends and twists to form the shape, especially the bottom panels as they approach the vertical areas of the bow and stern. 

Not too many details on this step, just that it took awhile to work all the way down the boat, switching sides ever 3 or 4 stitches. Next steps involve flipping the boat over and working on filling in the seams with epoxy and fiberglass. This locks the boat into its shape and embeds the interior copper wires into the epoxy bead. 

I'm very excited to have the boat take shape like this!


Tuesday, March 11, 2008

The kayak has landed

Three hours of building in the shop tonight netted some good progress, which is great because over the past week I have had little time to work on the boat, though I have been eager. Several times it's either been a challenge to fall asleep (thinking about the kayak) or I wake up at 4am and can't go back to sleep (thinking about the kayak). So, I finally had a huge block of time this evening to tackle a few major steps, which resulted in the boat finally taking shape.

The first step(s) involved taking the side panels (with the newly attached scarfs) and bending them into alignment. This is achieved by drilling several 1/16" holes through the wood along the bow and stern and threading copper wire through the holes and twisting. (This is how this kayak construction method gets the name "stitch and glue".) Next I spread the two panels apart with a temporary stick which I cut to length of 23 1/8", as needed to create a maximum kayak width of 23 1/2" (I had to factor in the thickness of each side panel into the spreader stick length). This stick is positioned 111" back from the tip of the bow.

The second major step was to work on the bottom panels by drilling 1/16" holes every 4" exactly 3/8" in from the panel edge. I made another scribe jig to mark the 3/8" distance and then measured off 4" increments. My power drill definitely came in handy, that's about 100 holes around the periphery. A nice thing to note is that the two bottom panels are mirror images, which means that I was able to drill through both panels (stacked) at the same time, saving time and increasing accuracy.

My final step of the evening was to stitch copper wire through both bottom panels along the straight edge, which when unfolded will become the keel of the boat. 

It's so cool to see the shapes and lines of a kayak now, and with each step it looks even more so.


Tuesday, March 4, 2008

More Clamps!

As you can see I've reached a point where the 10 clamps Leighann gave me for Christmas have come in handy, and even those were not enough. Here I'm using 25 clamps to securely hold the "sheer clamp" piece of wood to the side panel as the epoxy cures over night. Lining up the sheer clamp was a challenge, Leighann helped by being at one end of the piece while I was at the other. We lowered the sheer clamp down on top of the side panel which I had already brushed with epoxy. The trick (one of them) is to make sure the sheer clamp extends over the long edge of the side panel by .25". I made this easier by earlier scribing a line along the side panel to guide us in positioning the sheer clamp. Unfortunately I had used a red pencil which, I found out during the glue/alignment process, is really hard to see when the epoxy is on it.

So, hopefully everything is nicely aligned and equally coated in epoxy. I will be repeating the same step for the mirror side to the boat. Learning from this last step, I will not be using red pencil to mark alignments. 

These will be nice steps to check off in the build as once these sheer clamps are glued down I can start stitching together the panels and making this thing look like a kayak!